To make your own lip balm, melt ingredients like beeswax, coconut oil, and shea butter using a double boiler or microwave, then stir until smooth. Add your favorite essential oils for fragrance and therapeutic benefits, then carefully pour the mixture into clean containers like tins or tubes. Let it cool and solidify at room temperature or in the fridge. If you’re interested in creating personalized, chemical-free lip balms, there’s more to discover in the detailed steps.
Key Takeaways
- Melt beeswax, coconut oil, and shea butter using a double boiler or microwave until smooth.
- Mix in essential oils after melting to add fragrance and therapeutic benefits.
- Pour the warm mixture into prepared containers like tins or tubes carefully to avoid spills.
- Allow the lip balm to cool and solidify at room temperature or in the refrigerator.
- Customize packaging with labels or decorations for a personal, aesthetic touch.
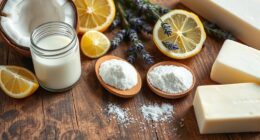
Have you ever wanted to create your own lip balm at home? Crafting your own lip balm allows you to choose natural ingredients and personalize the packaging to suit your style. Plus, it’s a fun way to guarantee you’re using safe, chemical-free products on your lips. To get started, gather some simple ingredients like beeswax, coconut oil, shea butter, and essential oils for fragrance and added benefits. These natural ingredients not only nourish and moisturize your lips but also give you control over what goes into your balm, avoiding artificial preservatives or fillers.
Create your own natural, personalized lip balm using simple ingredients like beeswax and coconut oil.
Once you’ve assembled your ingredients, it’s time to melt and blend them. Use a double boiler or a microwave-safe container to gently melt the beeswax, coconut oil, and shea butter until smooth. Stir well to combine everything into a uniform mixture. This step is vital because it guarantees your lip balm will have a consistent texture and effective moisturizing properties. When the mixture is ready, you can add a few drops of essential oils, like peppermint or lavender, to add a pleasant scent and extra therapeutic benefits. Remember to stir thoroughly so the oils are evenly distributed.
After your mixture is well combined, it’s time to think about DIY packaging. You can repurpose small containers, like clean lip balm tubes, tins, or jars, giving them a fresh look with labels or decorative touches. Personalizing your packaging not only makes your lip balm unique but also makes it a thoughtful gift for friends and family. To fill the containers, pour the warm mixture carefully into each, making sure not to spill. Be cautious because the mixture is hot. Allow the containers to cool and solidify at room temperature or in the refrigerator for quicker setting.
Creating your own lip balm isn’t just about the ingredients and packaging; it’s about guaranteeing your product is tailored to your needs. Using natural ingredients means you avoid harsh chemicals, and DIY packaging adds a personal touch that makes your creation special. Plus, making your own balm can be more cost-effective than buying commercial products, especially when you use reusable containers. Once set, you’ll have a smooth, nourishing lip balm ready to keep your lips soft and protected. Plus, every time you use it, you’ll enjoy knowing exactly what’s in it, making your homemade lip balm a healthier choice and a satisfying project to undertake.
Frequently Asked Questions
Can I Use Natural Ingredients Only?
Yes, you can use natural ingredients only for your lip balm. Opt for natural oils like coconut or jojoba, beeswax, and essential oils for flavor and scent. To preserve your balm without synthetic preservatives, consider natural options like vitamin E or rosemary extract. Just guarantee your ingredients are fresh and stored properly, so your lip balm stays effective and safe for your lips.
How Long Does Homemade Lip Balm Last?
Your homemade lip balm typically lasts about 3 to 6 months, like a loyal friend whose time together slowly fades. Proper storage duration and shelf life depend on ingredients and storage conditions—keep it in a cool, dry place, and always use clean tools. If it develops an off smell, color, or texture, it’s time to say goodbye. Regularly check your balm to enjoy safe, nourishing lips all season long.
Are There Any Allergy Concerns With Ingredients?
You should definitely consider allergy concerns with lip balm ingredients. To stay safe, do allergy testing on a small skin patch before full use, especially if you have sensitive skin. Be aware of common allergens like beeswax, coconut oil, or flavorings. Ingredient awareness helps prevent reactions, so read labels carefully and choose natural, hypoallergenic options when possible. This proactive approach keeps your lips healthy and avoids unwanted allergic reactions.
What Are Alternative Oils for Beeswax?
You can substitute beeswax with vegan waxes like candelilla or carnauba, or opt for plant-based oils such as coconut, jojoba, or shea butter. These alternatives provide similar texture and consistency, ensuring your lip balm remains smooth and nourishing. By choosing vegan waxes and plant-based oils, you create a cruelty-free, eco-friendly product that’s perfect for those with allergies or ethical preferences, while still achieving great results in your homemade balm.
How Do I Add Flavor Without Synthetic Chemicals?
To add flavor without synthetic chemicals, you can use natural flavoring options like edible herbs, fruits, or spices. Essential oils are also a great choice; just make certain you select food-grade, skin-safe varieties. A few drops of vanilla, peppermint, or citrus essential oils can enhance your lip balm’s flavor naturally. Be careful not to overdo it, and always test for skin sensitivity before full use.
Conclusion
Now that you know how to make your own lip balm, you can enjoy personalized, natural care anytime. Did you know that the global lip balm market is expected to reach $1.45 billion by 2027? That shows just how much people love keeping their lips soft and healthy. So why not create your own? It’s simple, fun, and allows you to customize flavors and ingredients. Give it a try, and your lips will thank you!