
Uncover the secrets to frying chicken like a pro! Start by brining the chicken in buttermilk, which tenderizes the meat and helps the coating stick. Next, dredge the chicken in a seasoned flour blend for an extra crispy exterior. When frying, maintain the perfect oil temperature to achieve that signature golden crunch. Don't forget to let the chicken rest after cooking – this allows the juices to redistribute for maximum flavor. Experiment with spice blends and garnishes to make each batch your own. With these expert tips, you'll be whipping up fried chicken that rivals the best restaurants. Intrigued? Keep reading to become a fried chicken master.
Key Takeaways
- Brine chicken in buttermilk for 8-24 hours to enhance juiciness and tenderness.
- Dredge chicken in a seasoned flour mixture to create a crispy, flavorful coating.
- Fry chicken in hot vegetable oil at 350°F until golden brown and cooked through.
- Allow fried chicken to rest for 5-7 minutes to drain excess oil and improve crispiness.
- Garnish with fresh parsley and serve with classic sides like coleslaw and biscuits.
Riding Lawn Mower Cover, Eventronic 54“ Riding Lawn Tractor Cover Waterproof Heavy Duty Durable (420D-polyester oxford)
Perfect Universal Fit:Fits decks up to 54",pretty big size ( L72"xW54"xH46"), compatible with most riding lawn mower brands,including...
As an affiliate, we earn on qualifying purchases.
History

Tracing its origins to the American South, fried chicken has long been a beloved staple in the culinary landscape. While its exact origins are hazy, the dish likely evolved from Scottish and West African cooking traditions, brought together by the ingenuity of enslaved people. The combination of crispy, golden-brown skin and juicy, tender meat quickly made fried chicken a household favorite.
Over the years, regional variations emerged, each with its own unique spice blends and preparation methods. Whether it's the buttermilk-brined fried chicken of the Deep South or the double-dipped, twice-fried version popular in the Midwest, fried chicken has become a symbol of American cuisine.
Today, chefs and home cooks alike continue to put their own spin on this timeless classic, experimenting with flavors and techniques to create the perfect crispy, craveable fried chicken.

MoJack EZ MAX 45001 Residential Riding Lawn Mower Lift - 450 Pound Lift Capacity, Zero Turn Radius Mowers, for Safe & Efficient Maintenance
Lift with safety and control: EZ Max provides homeowners with a dependable way to elevate ZTR mowers and...
As an affiliate, we earn on qualifying purchases.
Recipe

Fried chicken is a beloved dish that has been enjoyed for generations. The perfect balance of crispy golden skin and juicy, flavorful meat is a true delight. This recipe will guide you through the process of creating a delicious batch of fried chicken that's sure to impress.
The key to perfectly fried chicken lies in the preparation. By following a few simple steps, you can achieve that irresistible crunch and tender interior. Whether you prefer to use bone-in or boneless chicken, this recipe will work seamlessly.
Ingredients:
- 8 pieces of chicken (a mix of drumsticks and thighs)
- 2 cups all-purpose flour
- 1 teaspoon salt
- 1 teaspoon black pepper
- 1 teaspoon paprika
- 1 teaspoon garlic powder
- 1 cup buttermilk
- Vegetable oil for frying
Cooking Instructions:
In a large bowl, combine the buttermilk and chicken pieces. Cover and refrigerate for at least 30 minutes, or up to 24 hours. This step helps to tenderize the meat and create a crispy coating.
In a separate bowl, mix together the flour, salt, pepper, paprika, and garlic powder. Remove the chicken from the buttermilk, one piece at a time, and dredge it in the seasoned flour, ensuring an even coating.
Heat the vegetable oil in a large, heavy-bottomed pot or Dutch oven to 350°F. Carefully add the coated chicken pieces to the hot oil and fry for 12-15 minutes, or until golden brown and cooked through. Drain the fried chicken on a paper towel-lined plate and serve hot.
To ensure the best results, it's important to maintain the oil temperature and not overcrowd the pot. Frying the chicken in batches will help achieve that perfect crispy texture. Additionally, allowing the chicken to rest for a few minutes before serving will help the juices redistribute, resulting in a juicier and more flavorful dish.

Lawn Mower Lift Jack, Telescopic Maintenance Jack for Riding Lawn Mowers, Zero Turn Mowers and Garden Tractors, Foldable Easy Lift with Crank Handle and Power Tool Handle, 880 Lbs Weight Capacity
Perfect Lift Solution: The Lawn Mower Lift Jack is ideal for lifting multiple lawn care tools, providing easy...
As an affiliate, we earn on qualifying purchases.
Cooking Steps

First, brine the chicken in buttermilk overnight to ensure maximum juiciness.
Next, dredge the chicken in seasoned flour for a crispy, golden-brown exterior.
Then, fry the chicken in hot oil until cooked through.
Let the chicken cool briefly before serving to lock in the flavor.
Top it off with a garnish of fresh parsley for a vibrant finishing touch.
Step 1. Brine Chicken in Buttermilk Overnight

Brining the chicken in buttermilk overnight is a crucial step in this fried chicken recipe. It helps the meat stay incredibly juicy and tender, even after frying.
Start by placing the chicken pieces in a large bowl or resealable bag. Pour in enough buttermilk to completely submerge the chicken. Cover and refrigerate for 8 to 12 hours, or even up to 24 hours.
The acidic buttermilk tenderizes the chicken while the salt in the brine seasons it all the way through. This process also helps the breading stick better when you fry the chicken later.
When you're ready to cook, simply remove the chicken from the buttermilk, letting any excess drip off. You're now ready for the next steps – dredging and frying to create that perfect crispy, golden-brown fried chicken!
The long buttermilk brine is worth the extra time, so don't skip this essential prep work.
Step 2. Dredge Chicken in Seasoned Flour

After the chicken has finished its buttermilk soak, you'll want to dredge it in a seasoned flour mixture.
Start by setting up a dredging station with three shallow dishes. In the first dish, whisk together all-purpose flour, paprika, garlic powder, onion powder, salt, and pepper. This seasoned flour will create a delightfully crispy coating on your chicken.
Next, crack a few eggs into the second dish and beat them lightly. The egg wash will help the flour adhere to the chicken.
In the third dish, pour in some additional seasoned flour for a second coating.
Working one piece at a time, dip the chicken first into the egg wash, allowing any excess to drip off. Then, dredge the chicken through the seasoned flour, pressing gently to help it stick.
Flip the chicken and coat the other side as well. Shake off any excess flour before carefully placing the coated chicken aside.
Repeat this process with the remaining chicken pieces until they're all perfectly breaded and ready for frying.
Step 3. Fry Chicken in Hot Oil

Heat a large, heavy-bottomed pot or Dutch oven with at least 2-3 inches of high-quality vegetable oil over medium-high heat.
Once the oil reaches 350°F, it's time to fry your chicken. Carefully lower the dredged chicken pieces into the hot oil, making sure not to overcrowd the pot. Fry the chicken in batches if needed, maintaining the oil temperature. Flip the chicken occasionally to ensure even cooking.
Fry the chicken for 12-15 minutes, or until it's golden brown and the juices run clear when pierced with a fork. Be careful – the oil will be very hot, so use tongs or a slotted spoon to gently lift the chicken out of the pot.
Drain the fried chicken on a paper towel-lined plate to remove any excess oil. Let the oil return to temperature between batches. Once all the chicken is fried, you're ready to serve it up hot and crispy!
Step 4. Let Chicken Cool Before Serving

Once the chicken is fried, let it rest on the paper towel-lined plate for a few minutes. This allows the hot oil to drain off, resulting in a crispy, not greasy, final product.
Resist the urge to dig in right away – good things come to those who wait! During this resting period, the chicken will continue to cook slightly, ensuring it's done all the way through. Use this time to prepare your sides or set the table.
After 5-7 minutes, the chicken will have cooled enough to handle. Carefully transfer the pieces to a serving platter.
The resting time also allows the juices to redistribute throughout the meat, so every bite will be moist and flavorful. Now it's time to enjoy your homemade fried chicken masterpiece! Serve it hot, with your favorite dipping sauces on the side.
This extra step is what separates good fried chicken from great fried chicken.
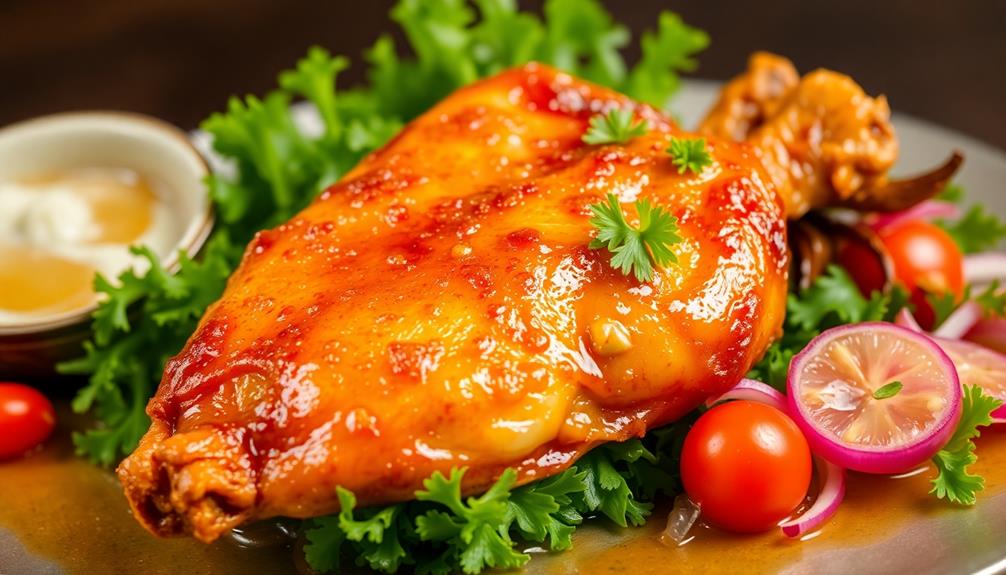
Step 5. Garnish With Fresh Parsley

With the chicken now rested and ready to serve, garnish it with some fresh parsley. Take a handful of vibrant, green parsley leaves and gently scatter them over the crispy, golden-brown fried chicken. The parsley adds a bright, herbaceous note that complements the savory richness of the dish.
The contrasting colors and textures create an appetizing presentation, elevating your homemade fried chicken to new heights. The fresh parsley also adds a refreshing, clean flavor that helps cut through the richness of the fried chicken.
Arrange the parsley in an artful, asymmetrical pattern across the chicken, allowing some leaves to cascade over the edges of the serving platter. Not only does the parsley garnish make your fried chicken look more visually appealing, but it also adds a pleasant aroma that will have your family or guests eagerly anticipating their first bite.
With this simple finishing touch, you can proudly serve your delicious, homemade fried chicken.

Szblnsm Riding Lawn Mower Cover, Waterproof Tractor Cover Fits Decks up to 54", Heavy Duty 420D Polyester Oxford, Covers Against Water, UV, Dust, Dirt, Wind for Outdoor Lawn Mower Storage
UNIVERSAL SIZE : The lawn mower cover size is 72 x 54 x 46 in(L*W*H), compatible with many...
As an affiliate, we earn on qualifying purchases.
Final Thoughts

Ultimately, you've mastered the art of crafting a mouthwatering batch of fried chicken. The savory, crispy exterior and juicy, tender interior are the result of your hard work and dedication. Whether you're serving this dish for a family dinner or impressing guests, you can take pride in your culinary accomplishments.
As you reflect on your journey, remember the key techniques that made all the difference: brining the chicken to lock in moisture, dredging it in a seasoned flour mixture, and frying at the perfect temperature to achieve that irresistible crunch.
These steps, combined with your patience and attention to detail, have elevated your fried chicken to new heights.
Moving forward, don't be afraid to experiment with different flavor profiles or techniques. The beauty of this classic dish is its versatility.
Enjoy the satisfaction of your homemade masterpiece, and savor every delicious bite.
Frequently Asked Questions
How Long Does Fried Chicken Need to Marinate?
Typically, fried chicken should marinate for at least 30 minutes to an hour. This allows the flavors to permeate the meat and ensures a juicier, more flavorful final dish. The longer it marinates, the more pronounced the seasoning will be.
Can I Use Boneless Chicken for Fried Chicken?
Absolutely, you can use boneless chicken for fried chicken. Boneless pieces are easier to work with and cook more quickly. Just be sure to adjust the cooking time accordingly to prevent the chicken from drying out.
How Do I Reheat Leftover Fried Chicken?
To reheat leftover fried chicken, preheat your oven to 400°F. Place the chicken on a baking sheet and heat for 10-15 minutes, flipping halfway through, until it's crispy and heated through. You can also reheat it in the air fryer or on the stovetop.
What Is the Best Oil for Frying Chicken?
The best oil for frying chicken is one with a high smoke point, like peanut, canola, or vegetable oil. These oils can withstand the high temperatures needed to get that perfect golden-brown crust without burning.
Can I Bread the Chicken Ahead of Time?
You can bread the chicken ahead of time, but it's best to do it just before frying. Breading too early can make the coating soggy and fall off. For best results, bread the chicken right before you're ready to fry it.