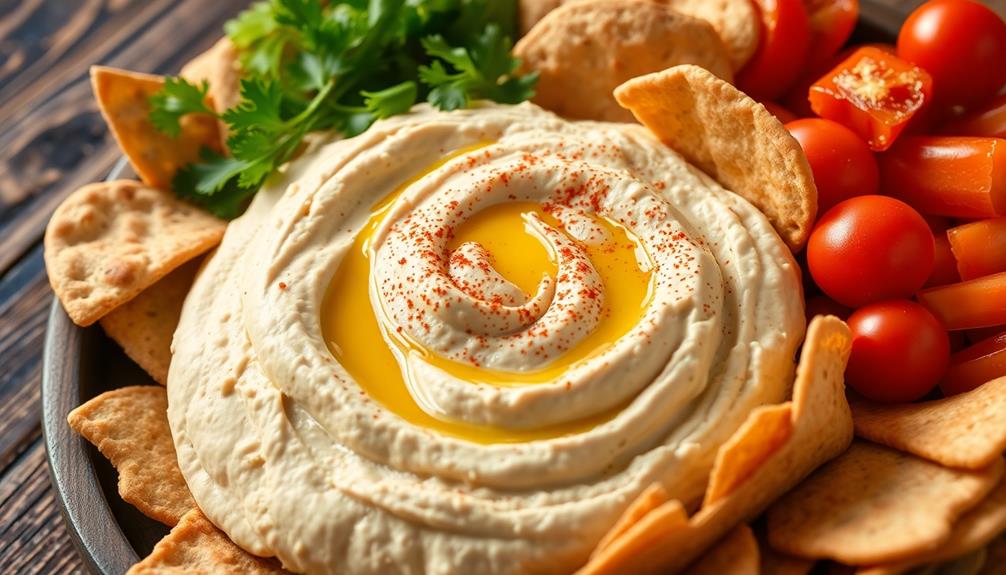
Homemade hummus is a healthy and tasty snack you can easily prepare at home. This ancient Middle Eastern dip is made with chickpeas, tahini, lemon juice, and spices. You can customize the flavors by adding your own touches, like roasted red peppers or fresh herbs. Blending the ingredients creates a smooth, creamy texture. Enjoy hummus with fresh veggies, pita bread, or crackers – it's packed with protein, fiber, and good fats. Storing homemade hummus in the fridge for up to a week makes it a convenient snack anytime. Of course, there's much more to explore when it comes to the art of homemade hummus.
Key Takeaways
- Homemade hummus is a nutritious, protein-rich, and customizable snack option made from chickpeas, tahini, lemon juice, and spices.
- Preparing hummus at home offers cost savings and the ability to control ingredients for a healthier dip.
- Proper blending and chilling techniques are crucial for achieving the optimal smooth and creamy texture of homemade hummus.
- Homemade hummus can be served with a variety of accompaniments, such as fresh vegetables, pita bread, or crackers.
- Homemade hummus can be stored in the refrigerator for up to a week or frozen for longer-term storage.
Top picks for "homemade hummu snack"
Open Amazon search results for this keyword.
As an affiliate, we earn on qualifying purchases.
History

Hummus' origins can be traced back thousands of years to the Middle East, where it has long been a staple in the region's cuisine. This creamy, protein-packed spread was likely first made by blending chickpeas, also known as garbanzo beans, with tahini (sesame seed paste), lemon juice, and various spices.
Over time, hummus recipes have evolved, with different cultures and families adding their own unique twists, like roasted red peppers or fresh herbs.
Today, hummus is enjoyed all around the world as a versatile dip, sandwich spread, or even a side dish. Its popularity has skyrocketed in recent years as people discover its delicious flavor and impressive nutritional profile.
Making your own homemade hummus is a fun and easy way to experiment with different flavor combinations while saving money compared to store-bought varieties. With just a few simple ingredients, you can whip up a fresh, creamy batch whenever the hummus craving strikes.
Recipe

Homemade hummus is a delightful and nutritious snack that can be prepared easily in your own kitchen. This creamy, protein-packed dip is a versatile addition to your culinary repertoire, and making it from scratch allows you to customize the flavors to your liking.
One of the best things about homemade hummus is its simplicity. With just a few basic ingredients and a food processor or blender, you can create a smooth, flavorful dip that rivals any store-bought version.
Plus, by making it at home, you have the opportunity to experiment with different flavor combinations and tailor the recipe to your personal preferences.
Ingredients:
- 1 (15-ounce) can chickpeas, drained and rinsed
- 1/4 cup tahini (sesame seed paste)
- 2 tablespoons freshly squeezed lemon juice
- 2 cloves garlic, minced
- 1/4 cup olive oil
- 2 tablespoons water
- 1/2 teaspoon ground cumin
- 1/4 teaspoon salt
Instructions:
In a food processor or high-powered blender, combine the chickpeas, tahini, lemon juice, garlic, olive oil, water, cumin, and salt. Process or blend until the mixture is smooth and creamy, scraping down the sides as needed.
Adjust the seasoning to taste, adding more lemon juice for tanginess, garlic for a stronger flavor, or salt to balance the flavors.
When making homemade hummus, it's important to use high-quality ingredients and to adjust the consistency to your liking. If the hummus is too thick, add a bit more water or olive oil to thin it out.
Serve the hummus with fresh vegetables, pita bread, or crackers for a healthy and satisfying snack.
Cooking Steps

First, you'll need to soak the chickpeas overnight, then drain and rinse them.
Next, blend the chickpeas, tahini, and your choice of seasonings until smooth.
Transfer the hummus to a serving bowl and chill it before serving for the best flavor.
Step 1. Soak Chickpeas Overnight

Soaking the chickpeas overnight is a crucial first step in making homemade hummus. This process softens the hard legumes, making them easier to blend into a smooth, creamy dip.
Start by placing the chickpeas in a large bowl and covering them with plenty of water. Let them soak for at least 8 hours, or even better, overnight. This allows the chickpeas to fully hydrate and plump up, so they'll blend more easily later on.
When you're ready to continue the recipe, drain and rinse the soaked chickpeas. You can discard the soaking water, as it contains compounds that may cause gas.
Now your chickpeas are prepped and ready for the next steps in the hummus-making process. Soaking may seem like an extra step, but it's well worth the effort for the best, creamiest homemade hummus.
With this simple prep work out of the way, you're on your way to delicious, fresh hummus to enjoy as a healthy snack.
Step 2. Drain and Rinse Chickpeas

After letting the chickpeas soak overnight, you'll want to drain and rinse them before proceeding.
Start by placing a colander in the sink and carefully pour the soaked chickpeas into it. The chickpeas will be swollen and soft, so handle them gently to avoid any damage.
Once in the colander, run cool water over the chickpeas, using your hands to stir and agitate them slightly. This will help wash away any leftover soaking water and any impurities.
Drain the chickpeas thoroughly, making sure to remove as much water as possible.
Next, transfer the drained chickpeas to a clean work surface or bowl. Give them a quick inspection, discarding any shriveled or damaged chickpeas you find.
With the chickpeas prepped, you're now ready to move on to the next step in making your delicious homemade hummus.
Step 3. Blend Chickpeas, Tahini, and Seasonings

With the chickpeas drained and ready, begin by adding them to a food processor. Toss in the tahini, a nutty sesame seed paste that gives hummus its signature flavor. Don't be shy – add a generous amount!
Next, squeeze in some fresh lemon juice. The acidity will brighten up the dip.
Now it's time to season. A pinch of ground cumin and a dash of garlic powder are classic choices. Feel free to experiment with other spices too, like smoked paprika or ground coriander. Add a sprinkle of salt and pepper to taste.
Pulse the processor until the mixture becomes smooth and creamy. Scrape down the sides as needed to ensure everything is well combined. Keep blending until you reach your desired consistency – some prefer a chunkier texture, while others like it silky smooth.
Once it's blended to perfection, transfer the homemade hummus to a bowl and get ready for snacking!
Step 4. Transfer to Serving Bowl

Once the hummus has reached your desired consistency, transfer the creamy mixture to a serving bowl.
Gently scrape down the sides of the food processor with a rubber spatula to ensure you get every last bit. This hummus is just begging to be enjoyed, so don't hold back!
Scoop the velvety hummus into your favorite bowl, smoothing the top with the back of a spoon.
If you're feeling fancy, drizzle a touch of olive oil over the surface and sprinkle with a light dusting of paprika or za'atar seasoning. This not only adds a pop of color but also enhances the flavors.
Now that your homemade hummus is ready, it's time to start dipping!
Grab some pita bread, carrot sticks, or cucumber slices and dig in. The creamy, garlic-infused spread is the perfect companion for all your crunchy dippers.
Get ready for your taste buds to be tantalized with every bite.
Step 5. Chill Before Serving Hummus

Refrigerating the hummus for a bit allows the flavors to meld and the texture to thicken slightly. Once you've transferred the hummus to a serving bowl, cover it with plastic wrap or a lid and place it in the refrigerator for at least 30 minutes.
This chilling time helps the ingredients fully incorporate, resulting in a smoother, more cohesive dip.
While you wait, prepare any accompaniments you'd like to serve with the hummus, such as pita bread, carrot sticks, or cucumber slices.
When you're ready to enjoy, give the hummus a quick stir to redistribute the oils and flavors. Dip in and savor the creamy, garlicky goodness.
The chilled hummus will keep in the fridge for up to a week, so you can snack on it throughout the week.
Final Thoughts

Homemade hummus offers a satisfying and nutritious snack option that you can easily prepare at home. With a few simple ingredients, you can create a flavorful dip that's perfect for dipping pita, veggies, or your favorite crackers.
The best part? Homemade hummus allows you to control the ingredients and customize the flavors to your liking.
As you've learned, the key to great hummus is blending the ingredients thoroughly and chilling it before serving. This helps the flavors meld and gives the hummus a smooth, creamy texture.
Don't be afraid to experiment with different spices, herbs, or add-ins to find your perfect hummus recipe.
Whether you're looking for a healthy snack or a crowd-pleasing appetizer, homemade hummus is a great choice. With a little time and effort, you can enjoy a delicious, nutritious treat that's sure to impress.
Frequently Asked Questions
How Long Does Homemade Hummus Last in the Refrigerator?
Homemade hummus can typically last 3-5 days in the refrigerator when stored properly in an airtight container. However, it's best to check for signs of spoilage, such as an off odor or discoloration, before consuming.
Can I Freeze Homemade Hummus for Later Use?
Yes, you can freeze homemade hummus for later use. Simply place it in an airtight container or freezer bag, leaving some headspace for expansion. It'll keep for up to 3 months in the freezer.
What Are the Health Benefits of Eating Hummus?
Eating hummus provides several health benefits. It's rich in protein, fiber, and healthy fats, which can help you feel fuller for longer and support cardiovascular health. Plus, the chickpeas in hummus are packed with vitamins and minerals.
Can I Make Hummus Without a Food Processor?
Yes, you can make hummus without a food processor. Use a blender or even a sturdy fork to mash the chickpeas and blend the ingredients together. It may take a bit more effort, but you can still enjoy homemade hummus.
How Can I Adjust the Flavors of Homemade Hummus?
To adjust the flavors of homemade hummus, you can experiment with different spices and herbs. Add more garlic, lemon juice, or tahini to suit your taste preferences. You can also try roasted red peppers or sun-dried tomatoes for extra flavor.