
TL;DR
Acoustic dampening and placement are key to a quiet, professional closet studio. Moving your rig out of the room or properly treating reflections and leaks makes a bigger difference than foam alone. Ventilation and smart positioning are your secret weapons.
Imagine hitting record, and all you hear is your voice — no fan hum, no motor whine. That’s the power of proper acoustic treatment and smart placement. Many creators overlook the simple truth: the best way to tame noise isn’t just foam or panels — it’s where you put your gear and how you isolate it.
In this guide, you’ll learn how to turn your tiny closet into a quiet, sound-friendly zone. From dampening reflections to blocking sound leaks, I’ll share concrete tips, real-world examples, and the secret weapon: moving your rig away from your workspace.
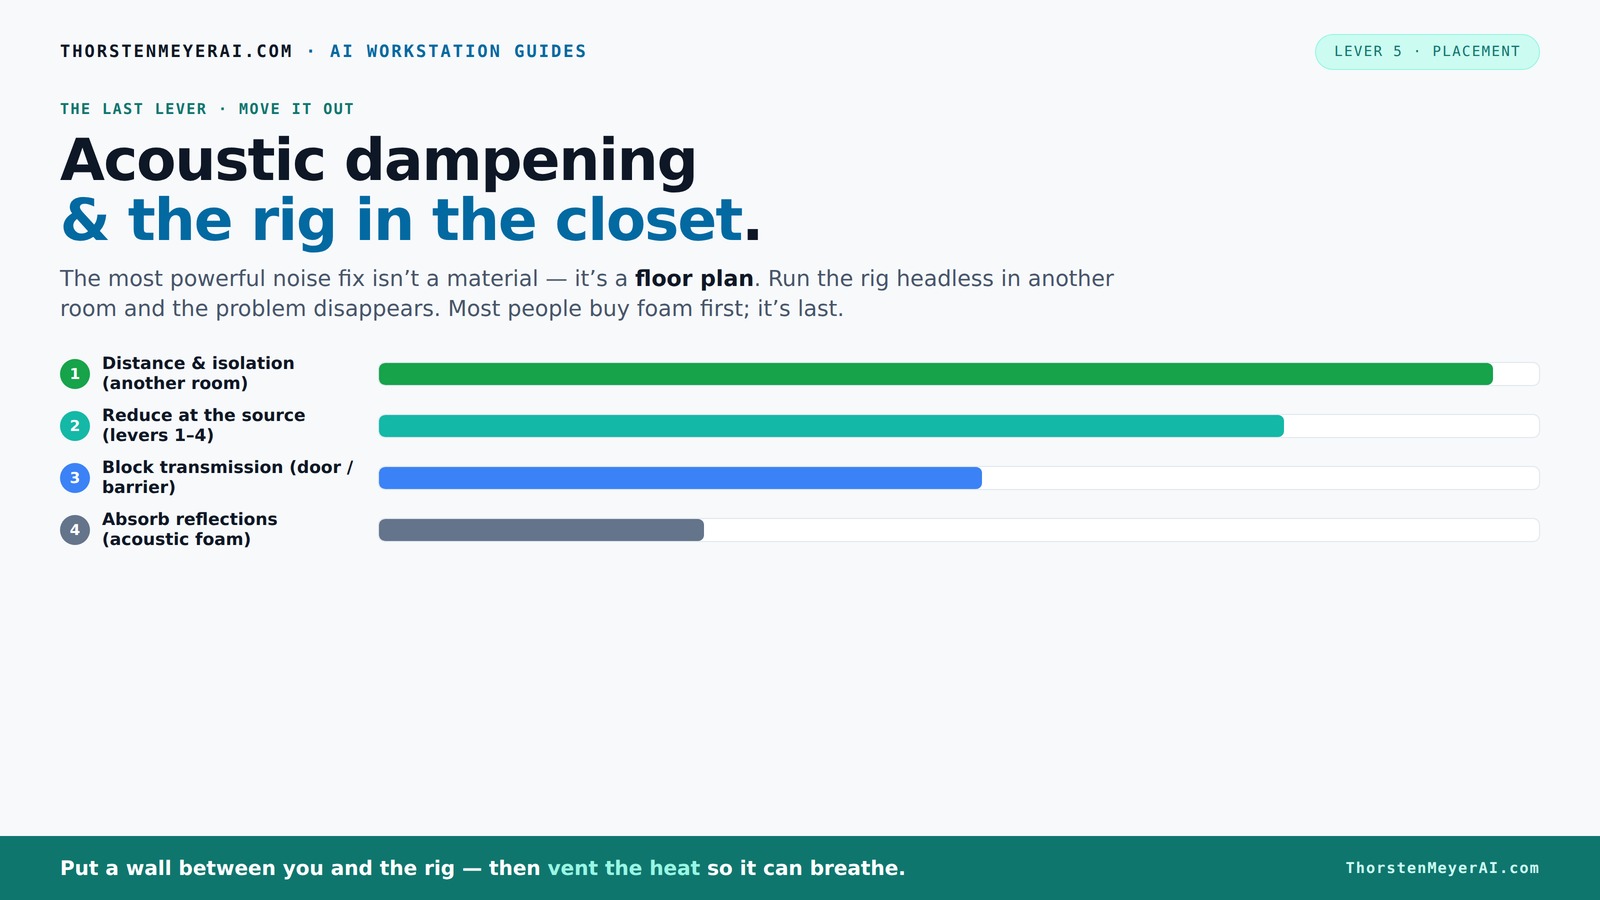
Acoustic dampening
& the rig in the closet.
The most powerful noise fix isn’t a material — it’s a floor plan. A rig you can’t hear because it’s in another room beats any amount of foam. Tap the approaches in Part 1 to see what actually works.
(another room)
(levers 1–4)
(door / barrier)
(acoustic foam)
Contain the noise, not the heat
Key Takeaways
- Relocating your rig outside your main workspace often has the biggest noise reduction impact.
- Proper ventilation and heat management are essential when placing a computer in a closet.
- Acoustic dampening improves sound clarity but won’t stop sound leaks; sealing gaps is crucial.
- Place treatment panels behind the mic, on the ceiling, and in corners for best sound quality.
- Treating floors with rugs and adding bass traps helps control low-end issues in tiny spaces.

Focusound 52 Pack Acoustic Foam Panels 1" x 12" x 12" Sound Proof Foam Panles Soundproofing Noise Cancelling Wedge Panels for Home Office Recoding Studio with 300PCS Double-Side Adhesive
- Soundproofing Design: Triangular grooves for noise absorption
- Includes Adhesive Tape: 300pcs double-sided adhesive for easy installation
- Easy Shape Recovery: Soak in water to restore shape
As an affiliate, we earn on qualifying purchases.
As an affiliate, we earn on qualifying purchases.
Why Moving Your Rig Is the Biggest Noise Fix You Can Do
The single most effective way to cut noise is simply relocating the machine. Think about it: a GPU rig tucked away in another room or closet produces zero noise in your workspace. You talk to it over the network, so why sit next to a loud, hot machine?
For example, I set up a high-power inference rig in my basement closet. I connect to it via SSH, and suddenly, my studio is silent. No fans, no hum. This approach is often overlooked because it feels less 'techie' than adding foam, but it’s the biggest win.
Plus, it frees you from the limitations of small spaces. You don’t need to worry about soundproofing or ventilation in your main room — just a wired connection and a way to keep it cool.
How a 'Rig in the Closet' Works — and the Hidden Heat Trap
Placing your computer in a closet sounds perfect — it muffles noise and keeps your workspace quiet. But be warned: heat is the enemy here. A sealed closet traps hot air, which can cook your machine. A GPU running at 600W will heat the space rapidly, causing fans to rev up and noise to spike in an endless cycle.
To make this work, ventilation is essential. You need at least passive vents or, better yet, a quiet exhaust fan that pulls hot air out. Some creators install custom soundproof cabinets with ducted airflow, combining quiet cooling with sound dampening.
For example, I use a small, ducted exhaust fan that vents hot air outside, keeping the closet cool even during long training runs. This setup prevents throttling and noise spikes, maintaining both silence and safety.
Acoustic Dampening vs. Soundproofing: What’s the Real Difference?
Acoustic dampening is about softening sound reflections inside your closet. Think thick blankets, foam panels, and rugs. They absorb and diffuse echoes, making your recordings clearer and less harsh. This process reduces the coloration of your sound caused by internal reflections bouncing around, which can muddy your recordings and make them sound less professional.
Soundproofing, on the other hand, stops sound from escaping — sealing gaps, adding weatherstripping, and using dense materials to block noise leaks. It’s about containing sound, not just softening it. The tradeoff here is that true soundproofing often requires extensive modifications and can be costly, whereas dampening is more about improving sound quality within the space.
For example, a closet lined with foam will improve voice clarity, but if the door leaks sound, your neighbors will still hear it. Add weatherstripping around the door frame, and the noise containment skyrockets. Understanding this difference helps you prioritize your efforts and budget effectively, ensuring you get the best results for your investment.
Where to Place Acoustic Treatment for Maximum Effect in a Closet
Placement is everything. Start with the main reflection points: behind your microphone and on the wall the voice points toward. These spots catch early echoes that color your recordings. Proper placement ensures that sound waves are absorbed before they bounce around and distort your recordings.
Next, treat the side walls and ceiling near your mic. Use thick panels or blankets to dampen reflections. A rug under your chair or on the floor also helps tame low-frequency rumble and echo. Carefully positioning your acoustic panels at the right spots maximizes their effectiveness, reducing harshness and improving clarity.
For example, I installed foam panels directly behind my microphone and on the ceiling, cutting down harsh reflections. I also added a thick rug, which softened the sound and absorbed bass buildup in the tiny space. The key is strategic placement — treating the most reflective surfaces first yields the greatest improvement in sound quality.
Do You Need Bass Traps in a Tiny Closet Studio?
Bass traps are low-frequency absorbers that prevent muddy sounds and standing waves. In small spaces like closets, they can be a game-changer because low frequencies tend to build up in corners, creating a boomy, muffled quality that muddies your recordings.
Placing bass traps in the corners is best — where low-end energy tends to concentrate. Even a small, DIY trap made from rockwool or thick foam can make a difference by absorbing these problematic frequencies. This prevents low-frequency buildup from causing muddiness and helps your recordings sound clearer and more balanced.
For example, I added foam bass traps in the corners of my closet, which smoothed out the deep rumble and made my voice sound more natural. Proper placement of bass traps is essential in small rooms to achieve a balanced, professional sound.
How to Stop Sound Leaks Through Doors and Cracks
Sound leaks through gaps, cracks, and open doors. To contain your noise, seal every opening with weatherstripping, acoustic sealant, or heavy blankets. Even small gaps can let in or out a surprising amount of sound, undermining your efforts to isolate your space.
Sealing these gaps is crucial because sound travels through any opening, and small leaks can significantly diminish your soundproofing efforts. Proper sealing prevents external noise from bleeding in and your recordings from escaping, which is especially important if you’re in close proximity to neighbors or shared spaces.
For example, I used weatherstripping around my closet door and hung a moving blanket over the front. The difference was night and day — my voice no longer leaks into the hallway, and outside noise stays out. This simple, low-cost step can dramatically improve your sound isolation, making your setup more professional and less intrusive.
Floor Treatments: Hard Surface or Carpet?
Hard floors bounce sound, creating more echo and low-end buildup. Covering the floor with a rug or carpet absorbs some of that reflection, making your recordings cleaner. The choice of floor treatment directly impacts the acoustics — hard surfaces reflect sound waves, causing unwanted reverberation, while soft coverings absorb them.
If your closet has concrete or tile, adding a thick rug or foam mats can significantly reduce harshness and improve clarity. For example, I placed a dense rug on my closet floor, which immediately improved vocal warmth and reduced echo. Combining floor treatment with wall and ceiling damping creates a more balanced acoustic environment, leading to clearer recordings and a more controlled sound profile.
Ventilation and Power: Keeping Your Closet Rig Cool and Connected
Cooling is critical. You need a way to ventilate the closet without adding noise. A quiet exhaust fan or ducted airflow keeps temperatures down and prevents throttling. Overheating can cause the hardware to slow down or shut off, leading to noise spikes and potential damage. Proper ventilation ensures your equipment runs efficiently and quietly.
Power outlets should be accessible, and cable management is key. Use extension cords and cable ties to keep everything clean and safe. Good cable management prevents accidental disconnections and reduces clutter, which can also help in maintaining proper airflow.
For example, I installed a small ducted fan with a thermostat that kicks on only when needed, keeping noise levels low while maintaining safe temps. Effective cooling and power management are essential to keep your closet rig running smoothly without disturbing your environment or risking hardware issues.
Frequently Asked Questions
What’s the difference between acoustic dampening and soundproofing?
Acoustic dampening softens reflections inside your space, making recordings clearer. Soundproofing blocks sound from escaping, sealing gaps and using dense materials to contain noise. Both are important, but serve different purposes.Where should I place panels in my closet booth?
Start by treating the wall behind your mic and the wall the voice points toward. Then, add panels on the ceiling and side walls near your position. Bass traps in the corners help control low-end buildup.How many panels do I need for a small closet?
It depends on the size, but typically 4-8 panels covering key reflection points, plus bass traps if needed. Focus on the primary reflection zones for maximum impact.Do I need bass traps in a tiny closet studio?
Yes. Bass traps in the corners help reduce low-frequency muddiness, giving your recordings a cleaner, more natural sound. Even homemade traps can make a noticeable difference.Will foam alone make the closet soundproof?
No. Foam absorbs reflections but doesn’t block sound leaks. To contain noise, sealing gaps and using heavy doors or blankets is necessary.Conclusion
The secret to a quiet, professional closet studio isn’t just foam — it’s where you put your gear and how you manage heat and sound leaks. Moving your rig into another room can silence your workspace instantly, while smart placement of panels and seals keeps sound where it belongs: inside the closet.
Remember: a little planning goes a long way. Your voice and recordings will thank you — and so will your neighbors. Now, go build that quiet, effective workspace you’ve been dreaming of.